Windows iSCSI
The easy way
I know this link comes from Solaris 10 pages, but the whole idea with Windows iSCSI is that you can use Solaris 10 and create a target with ZFS and then use it in Windows 7, or whatever Windows version you have.
You don't have to use Solaris 10 with ZFS to setup Windows with iSCSI, you can use iSCSI appliances such as NetApp or SUN ZFS 7000 unified storage.
I just wanted to create this page to show you how simple it is to configure the Windows iSCSI feature.
I have made a couple of screen shots of my Windows 7 system which explains the iSCSI setup step by step.
This should be the same for Windows XP SP2, Windows server 2003, Windows Vista and Windows Server 2008 and 2008 R2. I have done this with Windows 7 and Windows Server 2008 R2. The setup was similar for both these versions.
Let me explain the setup quickly. I have a Solaris 10 system running in an Oracle VM VirtualBox. I created a mirrored ZFS pool with two disks. The pool is about 1Gbyte. Out of this pool I created 2 volumes of 200Mbyte each.
I then set the shareiscsi property to, "on". This will make the 2 volume available as targets on the Solaris 10 system. I did not use any security options such as ACL's, CHAP or RADIUS. Just a stock standard target.
Below I outlined the command I used in Solaris. You could any device that can create iSCSI targets.
bash-3.00# zpool create mypool mirror c0d1 c1d1

bash-3.00# zfs create -V 200m mypool/vol1
bash-3.00# zfs create -V 200m mypool/vol2
bash-3.00# zfs set shareiscsi=on mypool/vol1
bash-3.00# zfs set shareiscsi=on mypool/vol2
So that's the iSCSI target setup. Let's start the Windows iSCSI setup. I'll use Windows 7 professional in my example.
First off all you need to start the windows iSCSI interface. I usually just click on "Start" and then search for iSCSI in the search text box. You can also click on "Start" -> "Control Panel" -> "All Control Panel Items" -> "Administrative Tools" and then select the "iSCSI Initiator" entry.
You might have to add the iSCSI initiator feature before it's visible in the Control Panel. It's not difficult to get it going. Use the help function if you get stuck.
Below is a screen shot of the Administrative Tools screen in Windows 7.
Windows 7 Administrative Tools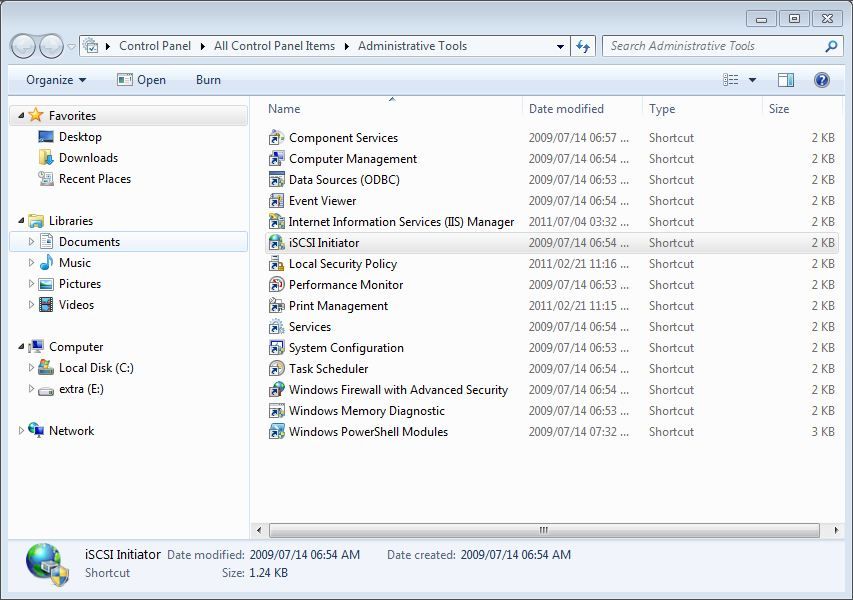 Click image to enlarge (Opens in new window)
Select the "iSCSI Initiator". You'll be presented with the "iSCSI Initiator Properties" window. The easiest way to get started is to enter the IP address of the target system in the "Target" dialog box, and click "Connect". This will check the iSCSI target system for any luns. This is like a, send targets discovery, in Solaris 10.
Below is a screen shot.
Windows iSCSI properties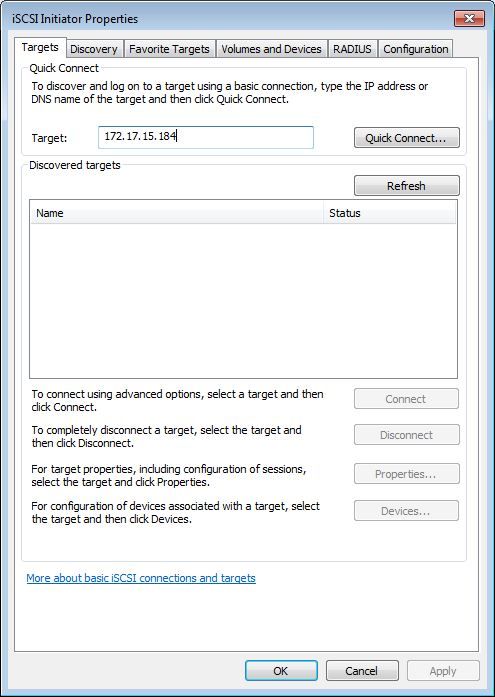 Click image to enlarge (Opens in new window)
After Windows has checked the target system it will populate the "Discovered Targets" window with, well, discovered targets.
On my system, Windows picked up two targets. Remember, I made two zfs volume available for use. Below is a screen shot of the targets.
Windows iSCSI Targets Click image to enlarge (Opens in new window)
You'll notice that both targets show as inactive. All you need to do is select the desired target and click on "Connect". This will connect the target to the Windows system. You have to add both targets if you want to use both, of course.
Windows iSCSI Targets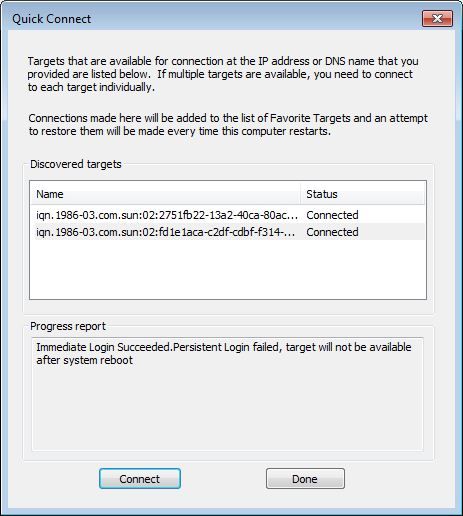 Click image to enlarge (Opens in new window)
The iSCSI targets are connected. We can now go and create filesystems on them like you would any normal new disk that you added. People tend to forget this step and then they think they were unsuccessful with their setup.
To use your new disks, you need to open the "Disk Management" window. Again, the easy way to find it is to go "start" and then search for "Disk Management".
Below is a screen shot of the Disk Management window.
Windows Disk Management window Click image to enlarge (Opens in new window)
Yep, there it is. Our 2 disks of 200Mbyte each is available for use. We just need to format it and create a filesystem on them.
You need to "right click" on the disk, and select "New Volume". Then specify what type of filesystem and size you want to use. Just go through the dialogs like any normal new disk you add.
Windows new simple volume wizard Click image to enlarge (Opens in new window)
Select the desired parameters. The wizard will guide through the whole process.
Windows new simple volume done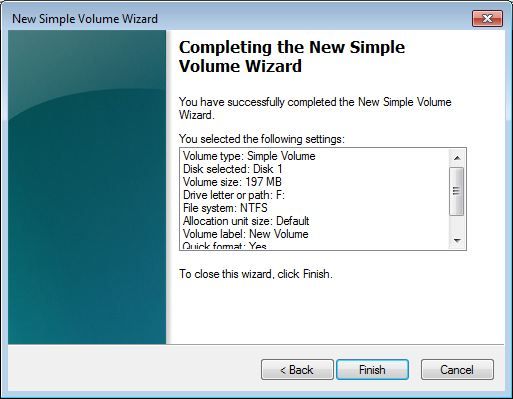 Click image to enlarge (Opens in new window)
Click finish and voila, you have a new disk to use. You can do the same with the other target. If you have a big lun, you can slice it into different size partitions and use it as different drive letters. You can do with this target whatever you need to do with it.
Below is a screen shot of the disk after it has been formatted. I assigned drive letter f to it. I can now start to save some stuff in this drive letter.
Windows new simple volume created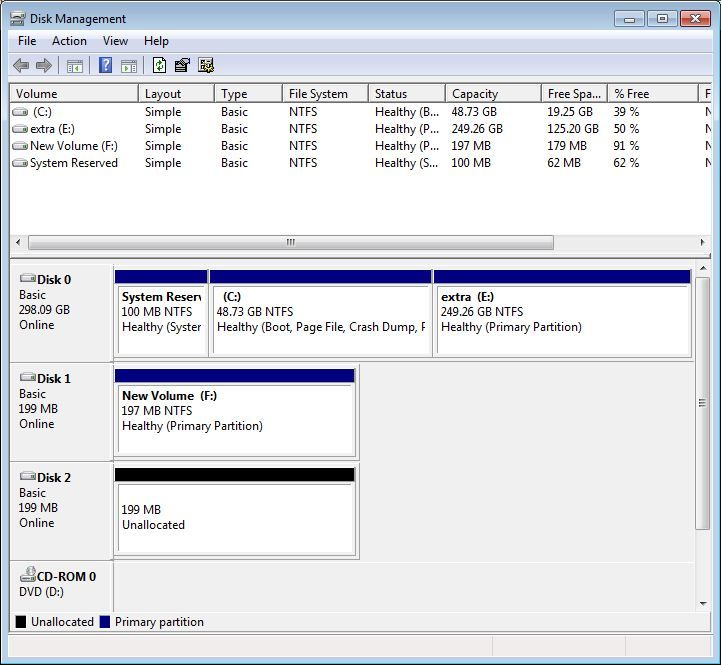 Click image to enlarge (Opens in new window)
Well, that's it. It's as simple as the procedure I showed you here. Nice!
Return from Windows iSCSI to Solaris 10
Back to What is My Computer


